Email Marketing
Use Email to prepare a newsletter, customer update or promotional message with your chosen sender and audience.
- Open Email and select Create.
- Enter a campaign name, From Brand and Subject; choose the Sender and Reply-To address.
- Choose a list, select a segment or paste the intended recipients.
- Prepare your email content and review the campaign settings.
- Set a schedule if needed, then save your draft or submit when ready.
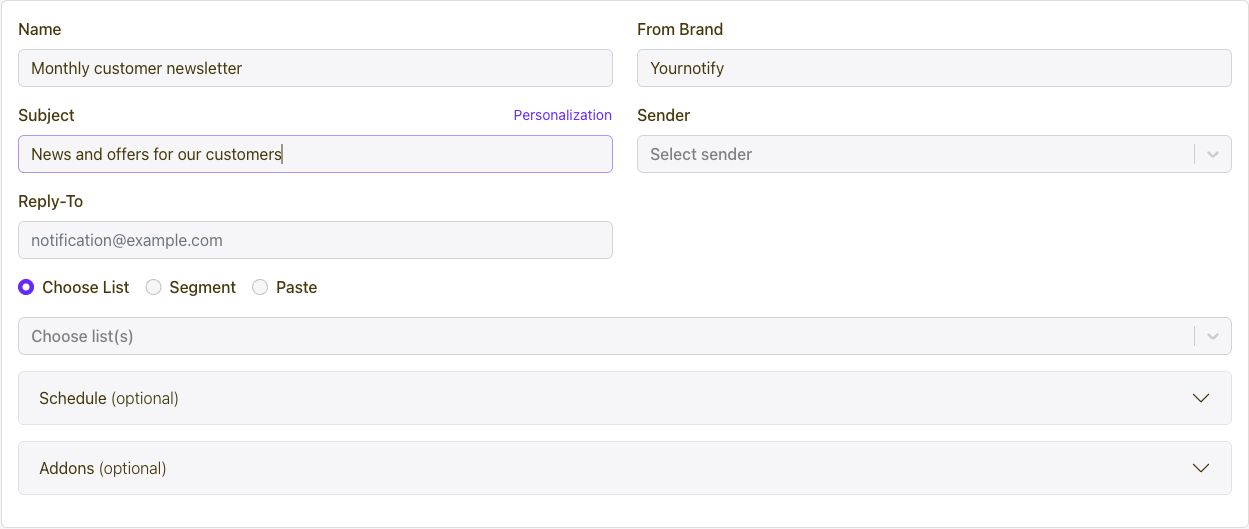
Email marketing helps you promote products, share newsletters and nurture customer relationships with a selected audience. Transactional email follows a specific customer action, such as an order, account event or service request.
Use campaign tools for planned marketing sends. Connect your application through the Email API or SMTP when a message needs to follow an event in your product.
Yes. Yournotify offers an Email API and SMTP integration so your application can send messages using a configured sender. Use the API when you want structured requests and campaign-related data; use SMTP when your application already supports an SMTP server.
Set up the sender, configure the credentials in your application and send a controlled test before switching your workflow on.
Use a verified sending identity, maintain a clean audience and send content customers expect. Keep your From name recognizable and your subject line relevant to the message.
Review delivery, bounces and engagement after each send. Remove invalid addresses, honour opt-outs and use the results to refine your next audience and message. Sender setup and audience quality are practical improvements you can make before increasing volume.
Scheduling lets you prepare your message now and choose when it should be sent.
- Complete your email sender, audience and content.
- Expand Schedule in the campaign form.
- Set the send date and time shown by the dashboard.
- Review the campaign and submit the scheduled send.
- Check the campaign list to confirm its scheduled status.
Open Email, select the campaign and open its analytics or report view. Review sending and delivery alongside the engagement metrics available for that campaign.
Use the report to identify bounces, compare audience response and see which links attract action. Compare campaigns with similar audiences and goals so you can make a useful decision about the next send.
Open Personalization in the campaign composer or insert a merge tag in your template. Choose the customer field you want to display, such as the recipient name or a saved custom attribute.
Check that the selected audience has a value for that field and review a sample before sending. Personalization works best when it makes the message more relevant, such as including an order reference or membership detail.
Use Personalization to insert a contact field in the email subject or content. Keep the field name consistent with your saved contact attributes and check a preview with a populated contact before sending.
Open the channel campaign list and use its type filter to narrow the records to the category you need, such as promotional or transactional. Combine the available period and search controls to find the campaign, then open its details or analytics.
Create a segment around the audience rules you need, then choose Segment in the campaign composer and select the relevant segment. Review the matching contacts and required channel details before submitting.
Plan the starting event, the messages and the time between actions. Build those steps in Automations, connect the required audience and templates, and test the workflow before activating it. Keep each step focused on a useful customer action.
Use an automation when reminders need to repeat around a customer event. Define the starting condition, prepare the reminder message and add the timing and conditions for each follow-up. Test the route and stop conditions before activating the series.
Use Automations to connect the customer event or audience rule to the next email action. Add the timing and conditions that match your onboarding or follow-up process. Prepare the sender, template and contact attributes before testing the journey.
Open Automations and select the automation you want to manage. Review its status and use the available activation or pause control to change whether it is available to the workflow.
Before changing the status, check the campaigns or journeys that use it. After saving, confirm the updated status in the list and review any dependent workflow.
Open Segments and select the segment you want to manage. Review its status and use the available activation or pause control to change whether it is available to the workflow.
Before changing the status, check the campaigns or journeys that use it. After saving, confirm the updated status in the list and review any dependent workflow.
A preheader is the short preview text that supports the subject line in an inbox. Add it through the email editor or template’s preheader setting and use it to give the recipient a useful reason to open the message.
Keep it distinct from the subject line and preview the email on mobile. A good subject and preheader work together to explain what the reader will find inside.
Open your email template in the editor and add the social-link or linked-image content you want to use. Enter the correct public profile URL for each link.
Use recognizable icons with enough spacing for mobile readers, then preview the email and check each destination before saving the template.
Compare two versions with similar sample audiences and one clearly defined change, such as the subject line or call to action.
- Prepare two variations and decide which result will determine the winner.
- Create separate sample lists from the intended audience.
- Send each version to its own sample list under comparable conditions.
- Compare the campaign reports after the same observation period.
- Use the stronger version for the remaining audience and keep the result for future planning.
Choose the version that performed best against the goal of your test. Prepare a campaign using that content and select the remaining audience, excluding the contacts who already received a sample.
Review the sender, subject, content and recipient selection before submitting. Keep the original test reports so your team can compare the final result with the sample performance.
Add UTM parameters to the destination URL so your website analytics can identify visits from the campaign. Use a consistent source, medium and campaign name across the links you want to compare.
For example, a link can use ?utm_source=yournotify&utm_medium=email&utm_campaign=october_offer. If the URL already has query parameters, add the tags using &.
Open the final link and confirm that the destination loads correctly. Review website visits and conversions alongside the Yournotify campaign report.
Open Email in the dashboard to review previous campaign records. Use the period, type and search controls to find the campaign you need, then open its details or analytics.
A clear campaign naming convention makes older sends easier to find. Include a date, audience or purpose in the name when your team runs several campaigns.